1.1 The Broker script stack.

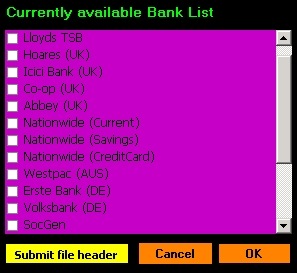
Located to the left of the screen, this contains all the shortcuts to loading the different brokerage CSV files. In addition to this, the stack includes an iCreateOFX Generic script. The Generic script will load CSV files with a layout described later in this text.
1.2 The Top command strip.

The three buttons to left of the command strip perform the following actions (described from left to right).
a. Write OFX – Button to write OFX file. Use this AFTER loading your CSV file into the grid (via the script buttons).
b. Download Scripts – This button starts the interface to download additional scripts. NOTE: The program ships only with the Generic script.
c. Settings – Use this button to access the (brokerage) Account settings and the Stock definitions.

The Show Advanced button. This controls the view-ability of three extra columns in the grid. The data has been set to default values, however, should you wish to change those values, you can do so. A description of the contents here these columns can be found later in the this text.
1.3 Registration and Licensing.
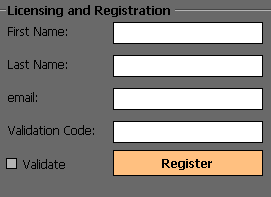
As the name suggests, this section of the screen handles the registration and licensing.
a. During the 30 Day trial, the program will display advertorial material, and for those running the program on a small screen, limit the size of viewable space. Should you wish to utilise the whole screen space and / or register with us, while connected to the internet please fill in the registration details and submit.
b. On purchasing a license to the program (before or after the 30 Day trial period expires), you will utilize the same screen to validate to License key. Please ensure you select the option to validate if you are still covered by the trial period.
2. Loading the Brokerage CSV file.
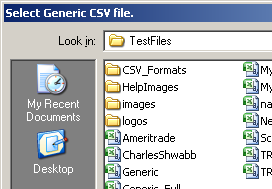
Select the required script from the Broker Script Stack. You are then presented with a Open file dialog box which you should utilize to browse to the file that you want to load. Choose the file and select Open.
It is important that you select the correct file for the chosen script since this will ensure no errors in writing out the investment OFX file.

The selected script name is always displayed in top left hand corner of the Open file dialog.
2.1 The Account details dialog
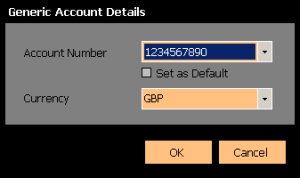
The account details dialog will be fired off the first time you load a brokerage file. This records and saves brokerage account details to be utilized to write a valid OFX file. The details are limited to account number and account currency.
By default the Generic Broker (thus Generic Script), ships with a dummy account set up with the system currency as its currency, and will be the default account used for the Generic script.
To add a new account to your Brokerage,select Add New Account from the Account Number drop-down, type the new account number and select the currency. Set it as the default by selecting the appropriate checkbox and select OK. This will the be the default account used to write OFX files for that particular brokerage.
You can also fire up the account details dialog by selecting the brokerage hyper-link in the bottom right corner. You can only do this, though, after loading a file into the grid.
2.2 The Action Map dialog
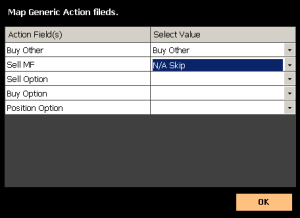
The first time you load a Brokerage file into the grid, you may be prompted by the Map Actions dialog. The purpose of this dialog is to map the specific transaction action descriptions of the brokerage. Brokers do choose to describe actions differently, for example, one broker may describe a transaction to buy stock as BUY whereas the next broker describes it as BUY STOCK. Both are correct, though we can not ship the multitude of these definitions since there could be hundreds of thousands of brokerages around the world (which the program aims to support). The task would be of some magnitude! Notwithstanding, some scripts (where our beta testers provided us with full details), do contain comprehensive action maps.
The mapping itself is straight forward. In the left column (headed Action Field(s))of the Map Actions Grid are listed the actions in your file that have not been shipped. In the right column (headed appropriately Select Value) are drop-down options to describe the actions supported by the program. Against each action, select the descriptive value from the corresponding drop-down list. Where no description matches an action you are mapping, select N/A Skip. This will ensure that you do not encounter errors when you attempt to write out your OFX file.
A Comprehensive list of supported actions/transaction types will be provided later in this text.
2.3 The Stock details dialog.
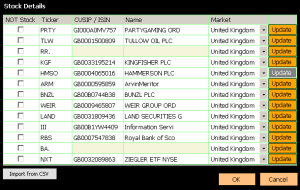
Similar to the Action Map dialog, the Stock Details dialog is fired up the first time you load a broker CSV file to the grid.
The purpose of this dialog is to obtain unique stock identification details that are necessary to write a valid investment OFX file. These details include the identifiers that are publicly available including the stock name and the CUSIP / SEDOL / ISIN number for each stock in your file. This data is not normally included in a CSV file, however, in the cases where it is included, then the program uses the included data and will not prompt you.
Usage is by selecting the appropriate market on which the stock is listed and (while connected to the internet) pressing the Update button. The program will then fetch data required and store it on your computer. For each stock, this only has to be done once, such that if you traded the same stock on a future date, the program will not need to fetch the data again.
You also have the option of importing the data from a CSV file or of manually typing it into the respective cells of the grid.
For Non-stock items, e.g some brokers (and our Generic script) utilize the value $CASH on transactions such as cash withdrawals and cash deposits in the action field, select the check-box in the NOT Stock column. This will disable the remainder of the row, and you do NOT have to enter additional data.
2.4 The loaded file
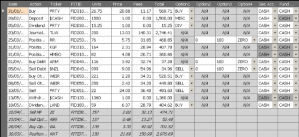
The grid is laid out in a sequential manner with the minimum necessary details to write a valid investment OFX file. The first eight (8) columns of the grid are described in the table below.
| Field | Description |
| Date | Date of transaction |
| Action | Transaction action – eg Buy, Sell |
| Ticker | Stock ticker symbol |
| FITID | Unique transaction ID |
| Units | Number of units involved in transaction |
| Price | Price per unit |
| Fees | Fees associated with transaction (includes taxes and commission) |
| Total | The total value of the transaction * Buy = (Units * Price) + Fees ** Sell =(Units * Price) – Fees |
* and ** – This does not apply to Buys or Sells of Bonds (Debt), Options or Mutual Funds which are factored by par values and / or shares per contract.
Its worthy a mention here about the data validation routine of the program. The grid will display an error icon in the Total column if the value does not equate to the computed correct amount. Hovering over the icon will display a suggested value. Take a while to review the data, and when you are happy
2.5 The Generic CSV file Layout.
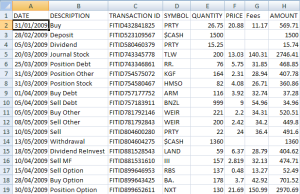
The Generic script will load a CSV file laid out as in the figure to the left. In total, there are eight fields of data separated by comma. The details of the columns are:
| Field Name | Description |
| Date | The date of the transaction |
| Description | or Action of the transaction |
| Transaction ID | The unique transaction ID * |
| Symbol | or Ticker for the transacted stock |
| Quantity | The number of units of stock(s) |
| Price | The price per unit of stock item |
| Fees | Fees e.g tax & commission |
| Amount | The total |
* if your file does not contain a Transaction ID, the program will generate a unique transaction ID for each of those transactions based on the date and the number of transactions without a unique ID.


